Path Visualization and Mapping Using Pygame
In this project, I explored integrating the DJI Tello drone with Python and Pygame to create an interactive visualization of the drone’s path. The goal was to control the drone using keyboard inputs and visualize its movement in a 2D simulation. Here’s a detailed breakdown of how the project was accomplished.
Project Overview
This project involves controlling a DJI Tello drone through a Python script and visualizing its movement on a Pygame window. The core components of the project include:
- Drone Control: Using the
djitellopylibrary to interface with the Tello drone. - Keyboard Input Handling: Capturing user inputs to control the drone’s movements.
- Path Visualization: Drawing the drone’s path and its heading direction on a Pygame window.
Code and Keypress Module
Keypress Module (keypress.py):
This module detects keyboard inputs and is used for controlling the drone.
1
2
3
4
5
6
7
8
9
10
11
12
13
14
15
16
17
18
19
20
21
22
23
24
25
26
27
28
29
30
31
# keypress.py
import pygame

def init():
    pygame.init()
    pygame.display.set_mode((400, 400))
    pygame.display.set_caption('Key Press Detection')

def get_key(key_name):
    for event in pygame.event.get():
        if event.type == pygame.QUIT:
            pygame.quit()
            exit()

    keys = pygame.key.get_pressed()
    key = getattr(pygame, f'K_{key_name}')
    return keys[key]

def main():
    if get_key("LEFT"):
        print("Left key pressed")
    if get_key("RIGHT"):
        print("Right key pressed")

if __name__ == '__main__':
    init()
    clock = pygame.time.Clock()
    while True:
        main()
        pygame.display.update()
        clock.tick(60)  # Limit the loop to 60 iterations per second
Main Script:
The main script controls the Tello drone and visualizes its path using Pygame.
1
2
3
4
5
6
7
8
9
10
11
12
13
14
15
16
17
18
19
20
21
22
23
24
25
26
27
28
29
30
31
32
33
34
35
36
37
38
39
40
41
42
43
44
45
46
47
48
49
50
51
52
53
54
55
56
57
58
59
60
61
62
63
64
65
66
67
68
69
70
71
72
73
74
75
76
77
78
79
80
81
82
83
84
85
86
87
88
89
90
91
92
93
94
95
96
97
98
99
100
101
102
103
104
105
106
107
108
109
110
111
from djitellopy import Tello
import keypress as kp
from time import sleep
import pygame
import math

# Experimental Constants
FORWARD_SPEED = 117 / 10  # Experimental Forward Speed in cm/s - Desired: 15 cm/s
ANGULAR_SPEED = 360 / 10  # Experimental Angular Speed in degree/s - Desired: 50 d/s
INTERVAL = 0.25  # Time interval between updates in seconds

DISTANCE_INTERVAL = FORWARD_SPEED * INTERVAL  # Distance covered in one interval
ANGLE_INTERVAL = ANGULAR_SPEED * INTERVAL  # Angle change in one interval

# Initialize variables
x, y = 250, 250  # Initial position of the drone
a = 0  # Initial heading angle
yaw = 0  # Initial yaw rate
path_points = [(x, y)]  # List to store the path points

# Initialize Tello
kp.init()
uav = Tello()
uav.connect()
print(f"Battery: {uav.get_battery()}%")

# Initialize Pygame
pygame.init()
width, height = 500, 500
screen_surface = pygame.display.set_mode((width, height))
pygame.display.set_caption("Drone Path Visualization")
clock = pygame.time.Clock()

def get_keyboard_input():
    global x, y, a, yaw

    lr, fb, ud, yv = 0, 0, 0, 0
    d = 0

    speed = 15
    a_speed = 50

    # Check keyboard inputs
    if kp.get_key("LEFT"):
        lr = -speed
        d = DISTANCE_INTERVAL
        a = -180
    elif kp.get_key("RIGHT"):
        lr = speed
        d = -DISTANCE_INTERVAL
        a = 180

    if kp.get_key("UP"):
        fb = speed
        d = DISTANCE_INTERVAL
        a = 270
    elif kp.get_key("DOWN"):
        fb = -speed
        d = -DISTANCE_INTERVAL
        a = -90

    if kp.get_key("w"):
        ud = speed
    elif kp.get_key("s"):
        ud = -speed

    if kp.get_key("a"):
        yv = -a_speed
        yaw -= ANGLE_INTERVAL
    elif kp.get_key("d"):
        yv = a_speed
        yaw += ANGLE_INTERVAL

    if kp.get_key("e"):
        uav.takeoff()
    elif kp.get_key("q"):
        uav.land()

    sleep(INTERVAL)
    a += yaw
    x += int(d * math.cos(math.radians(a)))
    y += int(d * math.sin(math.radians(a)))

    return [lr, fb, ud, yv, x, y]

def draw_path(screen, points):
    screen.fill((0, 0, 0))  # Clear the screen with black
    for point in points:
        pygame.draw.circle(screen, (0, 0, 255), (int(point[0]), int(point[1])), 5)  # Draw path points in blue
    pygame.draw.circle(screen, (0, 255, 0), (int(points[-1][0]), int(points[-1][1])), 8)  # Heading circle in green
    font = pygame.font.SysFont(None, 24)
    text = font.render(f'({(points[-1][0] - 250) / 100:.2f},{(points[-1][1] - 250) / 100:.2f})m', True, (255, 0, 255))
    screen.blit(text, (int(points[-1][0]) + 10, int(points[-1][1]) + 30))  # Display position in meters

running = True
while running:
    for event in pygame.event.get():
        if event.type == pygame.QUIT:
            running = False

    vals = get_keyboard_input()
    uav.send_rc_control(vals[0], vals[1], vals[2], vals[3])

    if (path_points[-1][0] != vals[4]) or (path_points[-1][1] != vals[5]):
        path_points.append((vals[4], vals[5]))

    draw_path(screen_surface, path_points)
    pygame.display.flip()
    clock.tick(60)  # Limit to 60 frames per second

pygame.quit()
Code Walkthrough
1. Experimental Constants
The experimental constants used in this project define the drone’s forward speed, angular speed, and the time interval between updates. These values were chosen based on experimental results and taken from the reference 1.
1
2
3
FORWARD_SPEED = 117 / 10  # Experimental Forward Speed in cm/s - Desired: 15 cm/s
ANGULAR_SPEED = 360 / 10  # Experimental Angular Speed in degree/s - Desired: 50 d/s
INTERVAL = 0.25  # Time interval between updates in seconds
2. Pygame Initialization
Pygame is initialized, and a window is created to visualize the drone’s path.
1
2
3
4
5
pygame.init()
width, height = 500, 500
screen_surface = pygame.display.set_mode((width, height))
pygame.display.set_caption("Drone Path Visualization")
clock = pygame.time.Clock()
3. Keyboard Input Handling
The get_keyboard_input function processes keyboard inputs to control the drone’s movement and updates its position. Trigonometric calculations are used to compute the new position based on the current heading angle.
4. Drawing the Path
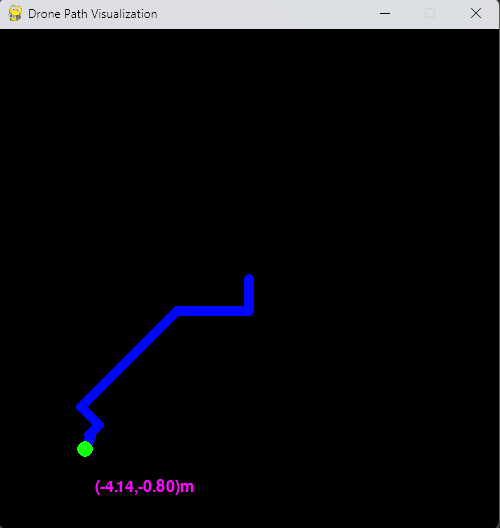
The draw_path function updates the Pygame window with the drone’s path. It draws circles for each point and updates the heading position with a green circle. It also displays the current position in meters.
5. Main Loop
The main loop handles Pygame events, updates the drone’s position based on keyboard inputs, and redraws the path. The loop continues until the user closes the window.
Visualization
Here’s a screenshot of the Pygame window displaying the drone’s path:

